Last week, my friend Marcus texted me a photo of his sad, soggy apple crisp with the caption “What did I do wrong?” I knew immediately—he’d fallen into the classic trap of treating the topping like an afterthought.
I walked him through my extra-crispy technique, and his next attempt had that perfect golden crunch that makes you fight over the corner pieces. Now he won’t stop making it, and honestly? I’ve created a monster.
History & Origin
When you bite into a warm apple crisp, you’re tasting a dessert that emerged from the practical kitchens of early American and British home cooks who wanted an easier alternative to pie. By the 1920s–1930s, “crisp” became the go-to term for this baked fruit dish topped with buttery streusel. Home cooks loved adding rolled oats—they were affordable pantry staples that created that satisfying crunch. As families adapted the basic formula with local ingredients and personal preferences, apple crisp evolved into countless regional variations. Its rustic simplicity and ease of scaling made it a Thanksgiving favorite, cementing its place in autumn traditions.
Recipe

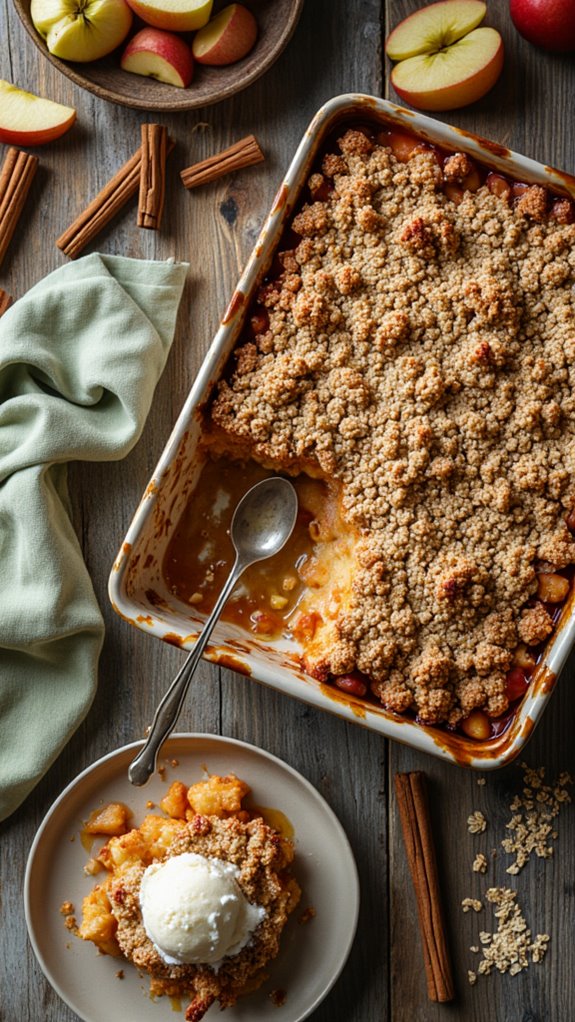
Apple crisp is a deceptively simple dessert that delivers impressive results with minimal effort. The key to a standout apple crisp lies in balancing tart and sweet apples—a combination of Granny Smith and Honeycrisp or Fuji apples creates a filling that’s structurally sound and perfectly sweet without being cloying. With 6–8 cups of sliced apples, you’ll have enough filling to create that signature bubbling edge while maintaining the integrity of each bite. The magic happens when you layer these apples with a buttery oat streusel topping that bakes into a deeply golden, irresistibly crispy texture.
The streusel topping is where this humble dessert truly shines. By combining old-fashioned rolled oats, flour, brown sugar, cinnamon, salt, and cold diced butter, you create pea-sized crumbs that bake into golden clusters. Adding a crunchy boost with Grape-Nuts or toasted nuts elevates the texture and flavor, giving you layers of crunch with every spoonful. A short 35–45 minute bake at 350–375°F brings everything together, and a brief cooling period allows the juices to thicken, ensuring your apple crisp holds together beautifully when served.


Ingredients
- 6–8 large apples (mix of Granny Smith and Honeycrisp or Fuji), sliced (about 6–8 cups total)
- 1½ cups old-fashioned rolled oats
- 1 cup all-purpose flour
- 1 cup packed brown sugar
- 1 tsp ground cinnamon
- ½ tsp salt
- ¾ cup (12 tbsp) cold diced butter
- 1 cup Grape-Nuts or chopped toasted nuts (walnuts or pecans)
Equipment
- 9×13-inch or 8×10-inch baking dish
- Cutting board and chef’s knife
- Measuring cups and measuring spoons
- Mixing bowl (large)
- Pastry cutter or fork
- Vegetable peeler (optional)
- Oven thermometer (optional)
- Cooling rack or wire rack
Instructions
- Preheat oven to 350–375°F and grease a 9×13-inch (or 8×10-inch) baking dish.
- Peel, core, and slice the apples into uniform pieces; arrange them evenly in the prepared baking dish.
- In a large mixing bowl, combine rolled oats, flour, brown sugar, cinnamon, and salt.
- Cut cold diced butter into the oat mixture using a pastry cutter or fork until pea-sized crumbs form.
- Stir in Grape-Nuts or toasted nuts until evenly distributed.
- Sprinkle the streusel topping evenly over the apples, pressing gently so it adheres.
- Bake at 350–375°F for 35–45 minutes until the topping is deeply golden brown and apples are bubbling at the edges.
- Remove from oven and cool for 10–15 minutes to allow juices to thicken before serving.
Nutrition
Calories (kcal): 285 | Carbohydrates: 42g | Protein: 4g | Fat: 12g | Saturated Fat: 6g | Polyunsaturated Fat: 2g | Monounsaturated Fat: 3g | Cholesterol: 24mg | Sodium: 195mg | Potassium: 180mg | Vitamin A (IU): 420 | Vitamin C (mg): 5mg | Calcium (mg): 35mg | Iron (mg): 1.2mg
Cooking Tips
For best results, use apples that are firm and fresh—avoid overly soft varieties that will turn to mush during baking. If preparing the crisp ahead of time, assemble it completely, cover with plastic wrap, and refrigerate for up to 12 hours before baking; add 5 minutes to the baking time if baking from cold. To prevent the topping from browning too quickly, tent the dish loosely with foil for the first 15–20 minutes, then remove to allow final crisping. Store leftovers covered in the refrigerator for 3–5 days and reheat at 350°F for 10–15 minutes or microwave briefly to restore topping crispness without drying out the apples.
Serving Suggestions
Apple crisp reaches its full potential when paired thoughtfully with complementary flavors and textures. Serve warm from the oven topped with a generous scoop of vanilla ice cream so the cold cream melts into the bubbling apples and contrasts the extra-crispy topping—a classic pairing that never disappoints. For added richness, drizzle salted caramel sauce or browned-butter caramel over each serving to create a sweet-salty counterpoint that complements the oats and butter in the topping. Those seeking a brunch or breakfast twist can spoon the crisp over Greek yogurt and sprinkle with toasted nuts and granola for added crunch and protein.
For a lighter alternative, offer whipped cream or crème fraîche instead of ice cream to brighten the spiced apple filling without weighing down the crispy topping. Individual ramekin portions dusted with cinnamon or nutmeg and served alongside hot coffee or spiced apple cider create a cozy, seasonally appropriate presentation perfect for fall gatherings.
Common Mistakes & Troubleshooting
The most common pitfall is using butter that isn’t cold enough, resulting in a greasy, dense topping rather than the desired pea-sized crumbs that bake into golden clusters. When I first made apple crisp, I melted my butter slightly while preparing ingredients, and the streusel baked into a flat, compressed layer that lacked texture and crunch. To avoid this, dice your butter directly from the refrigerator and work quickly when cutting it into the dry ingredients; if your kitchen is warm, chill the mixture for 15 minutes before baking.
Additionally, overbaking can dry out the topping, so set a timer for 35 minutes and check for a deep golden-brown color rather than assuming the full 45 minutes is necessary. If the apples release too much liquid and the crisp becomes soggy, you’ve likely used too many watery apples or skipped the cooling period—always allow 10–15 minutes for the juices to thicken before serving.
In Conclusion
This apple crisp delivers everything you want in a fall dessert—tender apples, warm spices, and that irresistibly crunchy topping that makes every bite memorable. The secret is in the ratio of butter to oats and sugar, creating clusters that stay crisp even under all that fruit. It’s the kind of recipe that becomes part of your regular rotation.
Don’t be afraid to experiment with your apple varieties or adjust the spice blend to your taste. The beauty of apple crisp is its forgiveness and flexibility. Serve it warm with a scoop of vanilla ice cream, and watch it disappear.
If you loved this classic version, you’ll want to try my Apple Crisp With Reduced Sugar for another delicious twist on this beloved dessert.