My neighbor Janet called me in a panic last Tuesday—her in-laws were arriving in two hours and she hadn’t started dessert. I rushed over with my game plan: make-ahead apple crisp.
Here’s what most people don’t know: apples actually release less liquid when prepped a day ahead, giving you a thicker, more flavorful filling. I showed her how to prep the components separately, and when her guests arrived, she just assembled and baked.
They thought she’d been cooking all afternoon.
History & Origin
Before apple pie dominated American dessert tables, home cooks were already reaching for a simpler alternative: apple crisp. I’ve found that this dessert evolved during the 19th and 20th centuries as a practical solution to ingredient shortages and busy schedules. Early American cookbooks featured “crisp” and “crumb” recipes by the late 1800s, but they really took off during the 1930s-1940s when pantry staples like oats and brown sugar became readily available. What started as wartime necessity transformed into a beloved classic. You’ll notice regional variations emerged too—some cooks added nuts or spices, while others mixed apple varieties, reflecting what grew locally and suited family tastes.
Recipe

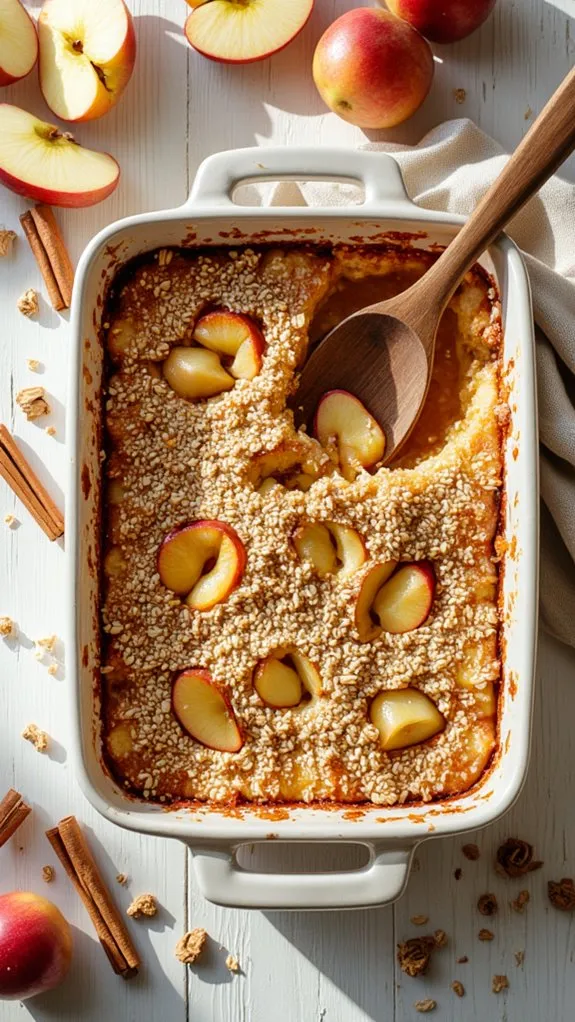
Apple crisp is one of the most forgiving desserts you can make, especially when you plan ahead. This recipe yields a comforting, home-style dessert that comes together with pantry staples and fresh apples. The beauty of this dish lies in its flexibility—you can assemble it up to a day in advance, keep components separate, and bake when ready. Whether you’re feeding a crowd with a 9×13 pan or making a smaller portion in a 9×9 dish, this recipe scales easily and delivers that perfect contrast between tender, spiced apples and a crispy, golden topping every time.
The make-ahead nature of apple crisp makes it ideal for busy cooks and entertaining. Simply toss your prepared apples with warm spices and a touch of sweetener, let them rest in the refrigerator overnight if desired, then top with the crumb mixture just before baking. The result is a dessert that tastes like you’ve spent hours in the kitchen, when in reality most of the work happens in minutes. Serve it warm with vanilla ice cream or whipped cream for an irresistible finish.


Ingredients
- 8 cups (6–8 medium) peeled and sliced apples
- 1 teaspoon ground cinnamon
- ¼ teaspoon ground nutmeg
- 2 tablespoons fresh lemon juice
- 2–3 tablespoons maple syrup or ¼–½ cup packed brown sugar
- 1–2 tablespoons all-purpose flour or arrowroot powder
- 1 cup rolled oats
- ½ cup coconut sugar or packed brown sugar
- ½ cup cold butter, cut into small cubes
- ½ cup all-purpose flour
- ½ cup almond flour (optional)
- 1 cup chopped pecans (optional)
- Pinch of salt
Equipment
- 9×13-inch baking dish or 9×9-inch baking dish
- Cutting board
- Sharp knife
- Large mixing bowl
- Small mixing bowl
- Measuring cups and spoons
- Fork or pastry cutter
- Oven
Instructions
- Preheat oven to 350°F.
- Peel, core, and slice apples into ¼-inch thick slices.
- In a large bowl, combine sliced apples, cinnamon, nutmeg, lemon juice, maple syrup or brown sugar, and flour or arrowroot; toss until apples are evenly coated.
- Transfer apple mixture to a 9×13-inch baking dish (or 9×9-inch for a half-batch).
- In a small bowl, combine rolled oats, coconut or brown sugar, all-purpose flour, almond flour if using, salt, and optional pecans.
- Add cold butter cubes to the oat mixture and use a fork or pastry cutter to break butter into the dry ingredients until the mixture resembles coarse crumbs.
- Sprinkle the crumb topping evenly over the apples, covering the surface.
- Bake for 45 minutes until the apple mixture is bubbly around the edges and the topping is golden brown.
- Remove from oven and let cool for 10 minutes before serving.
Nutrition
Calories (kcal): 285 | Carbohydrates: 38g | Protein: 4g | Fat: 14g | Saturated Fat: 5g | Polyunsaturated Fat: 2g | Monounsaturated Fat: 6g | Cholesterol: 15mg | Sodium: 95mg | Potassium: 180mg | Vitamin A (IU): 320 | Vitamin C (mg): 8 | Calcium (mg): 35 | Iron (mg): 1.2
Cooking Tips
When preparing the crumb topping, keep all ingredients cold for the best texture—cold butter creates pockets that crisp up beautifully during baking. If assembling ahead, store the apple filling and topping separately in the refrigerator; combine and bake directly from cold for about 45 minutes without thawing. For reheating a previously baked crisp, cover loosely with foil and bake at 350°F for 25–30 minutes, then uncover for the final 5 minutes to re-crisp the topping. The crisp can be frozen unbaked or baked for up to 3 months; thaw overnight in the refrigerator before reheating.
Serving Suggestions
Apple crisp reaches its full potential when served warm from the oven with thoughtful accompaniments that enhance its natural flavors. The classic pairing of vanilla ice cream provides an irresistible contrast—the cold creaminess melts into the warm, spiced apples while the topping maintains its satisfying crunch. For elevated presentations, drizzle each serving with browned butter salted caramel or warm maple syrup just before serving to add depth and richness. If you prefer a lighter option, whipped cream or crème fraîche offer a tangy, less heavy alternative that still complements the sweet apples beautifully.
For entertaining, portion the crisp into individual ramekins for buffet service; this not only creates an elegant presentation but also ensures each guest receives a warm single portion that retains heat longer than larger servings. The flexibility of this dessert extends to your serving style—whether plated individually or served family-style from a baking dish, apple crisp adapts to any occasion.
Common Mistakes & Troubleshooting
The most common pitfall is overbaking the topping, which results in a dense, hard crust rather than the desired golden-brown crispness. To avoid this, watch your crisp carefully during the final 10 minutes of baking and remove it promptly when the topping turns golden. Another frequent issue is using warm or softened butter when creating the crumb mixture; cold butter is essential for achieving those coveted coarse crumbs.
I learned this the hard way when I melted my butter slightly while mixing and ended up with a dense, cake-like topping instead of the intended crispy texture—now I always cut cold butter into cubes and work quickly. Additionally, if you’re reheating a make-ahead crisp, remember to loosely cover it with foil for the first 10 minutes at 350°F to prevent the topping from burning while the filling warms through.
In Conclusion
I’ve found that prepping this apple crisp the night before saves me so much stress on busy weeknights. You’re basically doing all the work upfront—mixing your filling, making your topping, chilling everything separately.
Then when you’re ready to bake, you just assemble and pop it in the oven. Forty-five minutes later, you’ve got this warm, golden, absolutely comforting dessert that tastes like you spent hours on it. That’s my kind of cooking.
This make-ahead apple crisp has become my secret weapon for easy entertaining and stress-free weeknight desserts. The prep work feels minimal when you spread it across two days, and the payoff is incredible. Plus, there’s something special about pulling a bubbling, fragrant dessert from the oven when everyone’s gathered around the table.
If you love the idea of do-ahead desserts, you’ll definitely want to check out my recipe for Apple Crisp With Caramel Drizzle that uses the same time-saving technique.