Last week, my neighbor Maria knocked on my door holding a Pinterest printout and looking defeated. “Why does my apple crisp always turn out soggy?” she asked.
I walked over, took one look at her mixing everything together in one bowl, and knew exactly what went wrong. Twenty minutes later, we had it fixed—crispy oat topping over perfectly tender apples. She texted me three days later: “Made it again. My kids ate the whole pan.” That’s the power of knowing when to keep things separate.
History & Origin
Though apple crisp sounds like it’s been around forever, the dessert didn’t make its first printed appearance until the early 1900s—and it really took off during the 1920s when American cookbooks started featuring it regularly. What made it truly shine was World War II. When rationing hit hard, home bakers discovered apple crisp required significantly less sugar, butter, and flour than traditional pies. That practicality transformed it from novelty into necessity, then into beloved staple. I find it fascinating how wartime constraints sparked a dessert that’s remained a kitchen favorite for generations.
Recipe

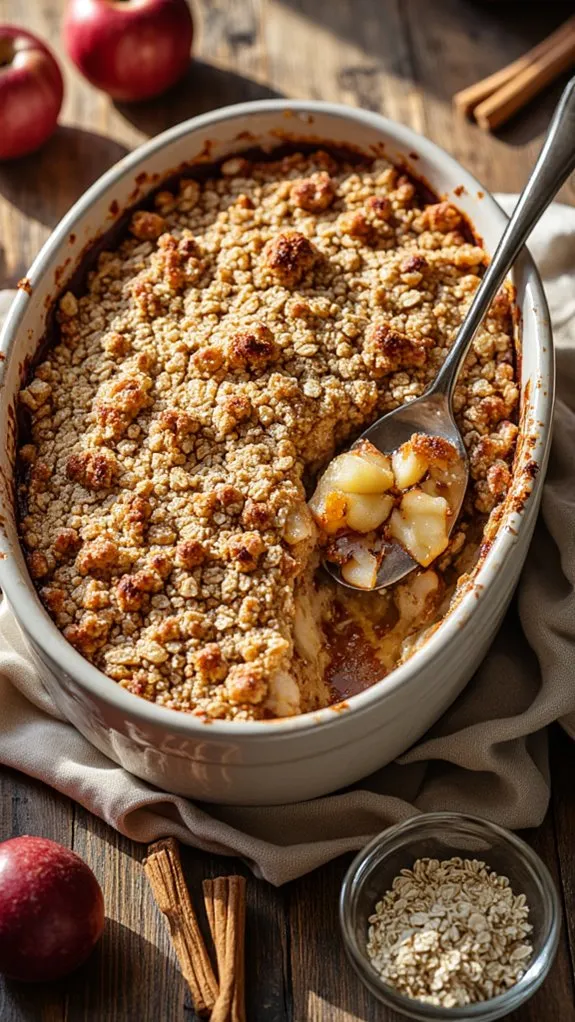
Old Fashioned Apple Crisp is a straightforward dessert that combines tender spiced apples with a buttery oat crumble topping. The beauty of this recipe lies in its simplicity—minimal ingredients, minimal technique, and maximum flavor. With just 15 minutes of prep work, you’ll have a bubbling, golden dessert ready to bake while you attend to other tasks.
This recipe serves 6–8 people and comes together in roughly one hour total. The apples soften into a jammy filling beneath a crispy-yet-tender topping that strikes the perfect balance between crunch and chew. Whether you’re baking for a weeknight family dinner or a casual gathering with friends, apple crisp delivers impressive results without the fuss of pie-making.


Ingredients
- 6–7 medium apples (about 6 cups chopped)
- 1/4 cup granulated sugar (for filling)
- 3/4 teaspoon ground cinnamon (divided: 1/2 tsp for filling, 1/4 tsp for topping)
- 2 tablespoons fresh lemon juice
- 1 cup brown sugar (packed)
- 1 cup old-fashioned rolled oats
- 1 cup all-purpose flour
- 1 cup unsalted butter (cold, diced into small cubes)
- Pinch of salt (optional)
- Butter for greasing the baking dish
Equipment
- 8×8-inch (or 8–10 inch) baking dish
- Cutting board and sharp knife
- Large mixing bowl
- Medium mixing bowl
- Fork or pastry cutter
- Measuring cups and spoons
- Peeler (optional)
- Oven
Instructions
- Preheat oven to 350–375°F and lightly butter the baking dish.
- Peel, core, and chop the apples into bite-sized pieces (approximately 1/2-inch chunks).
- In a large bowl, toss chopped apples with granulated sugar, 1/2 teaspoon cinnamon, and lemon juice until evenly coated.
- Spread the apple mixture evenly across the bottom of the prepared baking dish.
- In a separate medium bowl, combine brown sugar, oats, flour, remaining 1/4 teaspoon cinnamon, and salt.
- Add the cold diced butter to the dry mixture and use a fork or pastry cutter to break it into pea-sized crumbs, working until the mixture resembles coarse sand.
- Sprinkle the oat crumble topping evenly over the apple filling, pressing gently so it holds together without compacting.
- Bake at 350–375°F for 40–50 minutes (or 25–35 minutes for thinner versions) until the topping turns golden brown and the apple filling is bubbly at the edges.
- Remove from the oven and let cool for 5–10 minutes before serving.
Nutrition
Calories (kcal): 368 | Carbohydrates: 42g | Protein: 3g | Fat: 21g | Saturated Fat: 13g | Polyunsaturated Fat: 1g | Monounsaturated Fat: 6g | Cholesterol: 55mg | Sodium: 85mg | Potassium: 180mg | Vitamin A (IU): 820 | Vitamin C (mg): 5 | Calcium (mg): 35 | Iron (mg): 1.2
Cooking Tips
To ensure even baking and optimal texture, use apples that are firm but not overly hard—varieties like Granny Smith, Honeycrisp, or a mix work best. Cut the butter into small cubes and keep it cold throughout the mixing process; this creates those desirable pea-sized crumbs that become crispy and golden. If your topping browns too quickly before the apples are tender, loosely tent the dish with foil for the remaining bake time.
For the best flavor, don’t skip the lemon juice, as it brightens the apple filling and balances the sweetness. Leftovers can be refrigerated for up to three days and reheated gently at 350°F for 12–30 minutes, depending on portion size and whether you’re heating from cold or room temperature.
Serving Suggestions
Serve the apple crisp warm from the oven, scooping generous portions so each plate has both tender, bubbly apples and a golden oat topping. Top each serving with a scoop of vanilla bean ice cream or whipped cream to add creamy contrast and enhance the warm cinnamon-brown-sugar flavors. For an elevated finish, drizzle a spoonful of browned-butter salted caramel sauce over the ice cream and crisp just before serving. If serving family-style, place the baking dish on a trivet at the table and offer spoons so guests can help themselves while it’s still hot and bubbly.
Common Mistakes & Troubleshooting
Reheat refrigerated leftovers in a 350°F oven for about 20–30 minutes (or until warmed through) and refresh the topping under the broiler for 1–2 minutes if you want it crisp again. One common mistake is overbaking the topping—when I first made apple crisp, I left it in the oven too long and ended up with a hard, burnt crust instead of a golden, tender crumble.
To avoid this, check the crisp at the 40-minute mark and remove it as soon as the edges of the filling bubble and the topping turns golden, rather than waiting until it appears deeply browned. Additionally, using warm butter instead of cold butter will result in a dense, cake-like topping rather than the desired crumbly texture, so always dice your butter into small cubes and keep it cold until you’re ready to combine it with the dry ingredients.
In Conclusion
This old-fashioned apple crisp proves that the best recipes don’t need to be complicated. With pantry staples and fresh apples, you can create a dessert that rivals anything from a bakery. The crispy oat topping paired with tender, cinnamon-spiced apples makes this a year-round favorite.
Once you master this classic version, don’t be afraid to experiment with different apple varieties or add-ins. I love serving mine warm with a scoop of vanilla ice cream, but it’s equally delicious for breakfast with a dollop of Greek yogurt.
If you enjoyed this recipe, you’ll love my twist on this classic with Apple Crisp With Vanilla Ice Cream.